
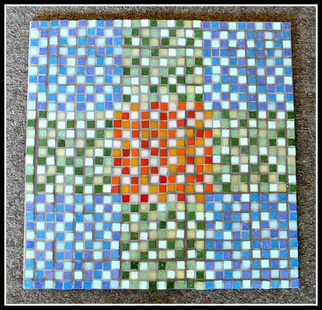
STEPPING STONE
Another great beginners project as no tools are required.
In this project I have used 10mm vitreous tiles, but you could substitute these with 20mm tiles.
Materials
1 x 330mm x 330mm floor tile (these are a great inexpensive alternative to the stepping stones that can be purchased at garden centres). I have mosaiced the underside of the tile.
10mm vitreous tiles: 4 shades of green = total 324 tiles - I used Lime, evergreen, stem green and sorbet
4 shades of blue = total 400 tiles - I used Atlantic, tide, snowcap and pool
4 shades of red = total 126 tiles - I used Poppy, pumpkin, tomato and peony
Weldbond Adhesive
Small paint brush
Grout
Soft cloths
Ruler
Black Vivid
|
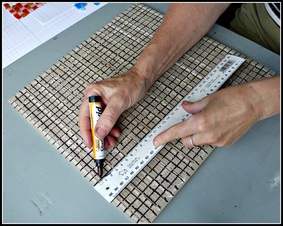
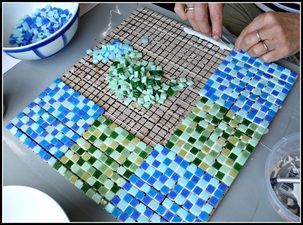
Instructions Step One Rule a grid onto your floor tile. |
|
|
Step Two
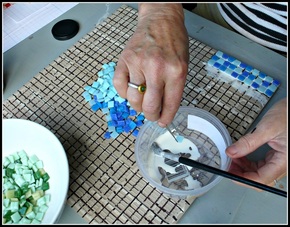
Begin gluing down your first block of colour. I like to brush glue onto the floor tile and then dip each tile into the glue to ensure a good attachment. The use of tweezers is great for handling the small tiles. |
|
|
Step Three
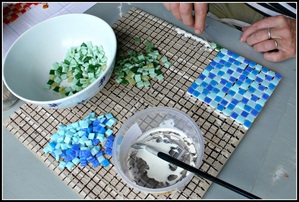
Move onto your second block of colour. |
|
|
Step Four
Continue your pattern around the tile. |
|
|
Step Five
When all colour blocks are complete leave the piece for at least 24 hours for the glue to completely dry. |

|
Step Six
Before grouting rub your hands over the piece to make sure that there are no loose tiles. If you find a loose tile glue it back down now and leave for another 24 hours.
Mix and Apply Grout
You will need:
Powered grout
Water
A container – I find that a round plastic bowl works best
A dust mask and gloves
A stirring tool – an old spoon is good
A spreading tool – depending on your mosaic – if it is flat then you can use a squeegee – if it is not flat then use a sponge or your fingers but be sure to protect them with gloves.
Foam sponges
Soft cloth
Newspaper to spread over your working area
Bucket with water to rinse out the foam sponges
Here’s How
1. Prepare – spread newspaper over your work space. Assemble your tools and supplies.
2. Mix – pour grout into the bowl and begin to add water. A little at a time.
Grout is like icing sugar, if you add too much water you have to add more icing sugar.
Stir, adding small amounts of water until the grout is the consistency of peanut butter. Do not over stir because you do not want to add air bubbles into the grout.
3. Leave it to slake. The grout needs approximately 10 minutes for the chemical reaction to take place.
4. After 10 minutes stir once more.
|
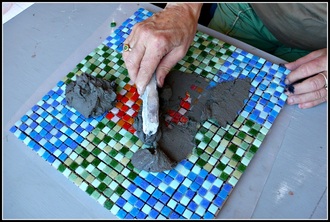
5. Spoon the grout onto your piece. Use the spreading tool to spread the grout into the gaps between the tiles. Be sure to fill all the gaps, including the sides.
|
|
|
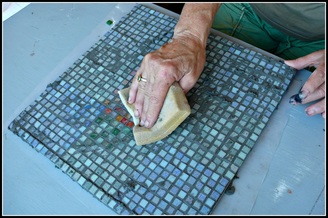
6. Wipe off the excess grout from the top of the tiles using a dry foam sponge. Many people will tell you to use a damp sponge but if the sponge is too wet the grout will turn to mud.
I find it is better to use a dry sponge. Keep turning the sponge over to use a clean side. When all sides have been used put it in the bucket of water and use a new sponge. |
|
|
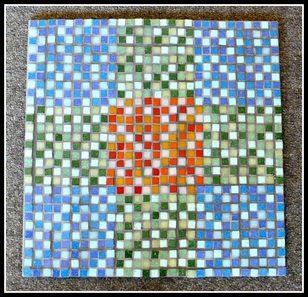
7. Once all the excess grout has been removed from the top of the tiles wait for approximately 10 minutes. The grout on the top of the tiles will begin to look powdery, this is the time to polish using the soft cloth. Be careful not to drag the grout out from between the tesserae.
8. Wait an hour and give your piece a final buff. Wait for 24 hours before putting your stepping stone outside. |
|
If you would like this pattern as a PDF click the link below to download it.
| stepping_stone_instructions.pdf |
